Whew! Modem problems, graduations, final exams, and cakes have kept me away far too long! Fear not. I have not forgotten nor forsaken you, my lovely cake friends. I have files upon files filled with scrumptious cake happenings to show you, starting with this:
For the two people who haven’t heard, one of the latest crazes in cakes is cake truffles. Please, call them truffles. They are time consuming to make and if we keep calling them cake balls no one is going to want to pay what they’re worth. Think marketing, k? Besides, some people are immature and snicker when you say, “balls.”
Cake truffles are a great way to use leftover cake, but they can also be made with an entire cake. You will, however, have to invest mondo amounts of time to do an entire cake. Just sayin’. Plan accordingly. Basically, you smoosh the cake into crumbs, add icing, roll into ball shapes, and dip the truffles in chocolate. You can use any combination of flavors that strikes your fancy. You can add flavored oils to them if you like. You can use up leftover frosting. You can magically use vanilla cake and turn it into chocolate cake just by using chocolate frosting. They can be frozen. Watch out for bloom, though. If they bloom, thaw them until they are dry and sift either confectioner’s sugar for white chocolate or cocoa for regular chocolate over them to cover up the white spots. The spots aren’t harmful, just fugly. I actually prefer them frozen. I should warn you: they are addictive. These are not “I need to fit into a smaller size” treats.
I’ve figured out all sorts of things along the way, but there was one issue left and I think I may have solved it. How does one set them down after dipping? I’m jumping ahead, though. Let’s start at the beginning.
The cake needs to be broken up into small pieces. It should be bigger than grains of sand, but smaller than chunks. Chunks will make it difficult to roll a smooth truffle. The easiest way I’ve found to do this is in my food processor.
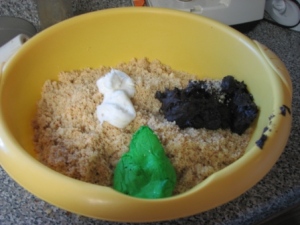
Now add the buttercream. Some people use canned frosting, but the best flavor is with homemade, in my opinion. Here, I’m using bits of leftover frosting from other projects.
See the dark chocolate frosting? That’s what is going to turn this vanilla into chocolate.
The amount of frosting to use varies from cake to cake. Start small and add more as needed. Don’t go by the amount shown above as the bowl is potato salad for a family reunion huge. Start with one of the dollops shown and go from there. Test it by rolling it into a ball shape. You want it to firmly hold together without cracking.
(I added cocoa to this batch to make it more chocolately and to correct adding too much frosting.)
It will probably stick to your hands a bit once you’ve rolled 3 or 4 of them.
(Shoes are for sissies or paid orders, LOL)
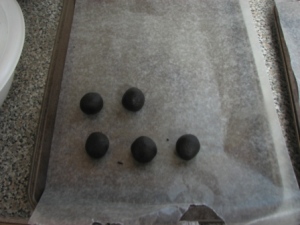
Once you’ve reached the correct consistency, roll all of the truffles and as you roll them place them on a waxed paper lined cookie sheet.
When the sheet is full (or you run out of mix, whatever happens first), put them in the freezer. At this point you can freeze them until they are solid, toss them in a Ziploc type bag, put the bag in the freezer, and stop here until you are ready to dip them. This is handy if you don’t want to risk chocolate bloom but don’t have time to do it all right now.
Once you’re ready to dip, have the paper lined cookie sheets handy. I like to start with an empty one so I’m not maneuvering around the undipped ones. However, with my latest method, this isn’t a problem.
The type of chocolate you choose is personal preference. You can use chocolate chips, candy melts, leftover Easter bunnies, or go high class and use couverture (that’s so fancy I don’t know how to spell it). Let your budget and personal preference guide the way. The important thing here is that the chocolate must be tempered. It what you use isn’t already tempered, you’ll have to learn how to do that first. A topic for another day and for someone much more experienced than me.
Note: Chocolate and moisture do not mix. It will make the chocolate seize. You will know it has seized because it won’t be all melty and smooth anymore. You can try to rescue seized chocolate by stirring in shortening a teaspoon or so at a time until it returns to the correct consistency.
Now that you know that, chop the chocolate.
Hang in there, we’re almost done. It’s time to melt the chocolate. There are three methods to accomplish this:
Double boiler (see above pic)
Microwave (which is difficult for me to achieve the perfect temp: melted but not burned)
Crock pot type melting device (see below pic)
(The pictures I’m using are a combination of batches. The ones shown above are coconut flavored cake truffles.)
Get the truffles from the freezer while you are melting the chocolate. If you dip them when they are too cold, the chocolate will crack so you want them solid enough to hold together while dipping, but not too solid or you’ll have to dip twice to cover cracks. Dip to your heart’s content, let the chocolate set up, and they’re finished.
This brings me to my dipping experiment. As I said, I don’t have a lot of luck moving the truffle from the chocolate dipping area to the cookie sheet. I have tried all sorts of devices: toothpick, fork, spoon, and several special instruments made for chocolate dipping. None of them work to my satisfaction. Tapping the instrument against the side of the pan helps the excess drip off but you can’t do that with a toothpick. If you don’t use a toothpick, you have to cover them completely with chocolate, which means there’s no uncovered “blow hole” to prevent blow outs. It’s a dilemma.
Instead of using cookie sheets to place them on to harden, get out your cooling racks and cover them with waxed paper. This method uses more toothpicks, but sometimes sacrifices must be made. Using one of the toothpicks, poke holes into the waxed paper.
Hopefully you can see the spaced holes in the picture. Dip the truffle into the chocolate, covering almost completely. Remember: you want a small spot left uncovered. The sensible place for this is near the toothpick which you stick into the middle of the bottom of the truffle so it won’t be seen unless someone has an uncontrollable urge to look at truffle butts or something.
(The uncovered area should be a lot smaller than shown above. This picture also shows the difficulty in dipping when the chocolate level gets low.)
Now that the truffle is dipped, you are going to put the toothpick (still stuck in the truffle) into one of the holes in the waxed paper. It’s easier to start in the center of the rack and work your way outwards. One hand holds the toothpick from above while the other waits underneath the rack to receive the toothpick. Move slower than you think so it’s doesn’t drop from one hand to the other.
Place the toothpick into the hole, pause, put your other hand underneath and grasp the part of the toothpick sticking through the hole. Remove the hand that’s above the rack, and with the hand that’s grasping the toothpick below the rack, lower the truffle until it is sitting on the waxed paper. Let go of the toothpick and slowly remove your hand from beneath the rack.
Ta da!
Your truffle is now sitting on the rack and it hasn’t rolled anywhere, you didn’t scrape off chocolate getting it from the toothpick to the rack, and your fingers aren’t chocolate covered in the process.
You can dip about 6 truffles and then the chocolate is set enough on the finished truffles to enable easy removal of the toothpicks so you can reuse them for the rest of the truffle dipping.
Other than using more toothpicks, the only problem I have with this method is removing the chocolate that pools at the bottom of the truffle. When using the cookie sheet method, you can score around the bottom of the truffle before the chocolate is completely set. You can’t do that with this method. However, I always had to fine tune them with the other method, so it’s no biggie for me.
Once the chocolate is completely set and all the toothpicks are removed (you can place the racks in the fridge or freezer to hurry this process), use a cookie sheet (rimless is best) and slowly pull the waxed paper off the rack onto the cookie sheet. Most of your truffles should stay stuck to the waxed paper. If not, as long as the chocolate is firmly set, it’s not a problem. Now that they are on a solid surface, you can trim the pooled chocolate with the knife of your choice.
Eat. Enjoy. Place in mini cupcake wrappers and impress your friends with their elegance.
Just don’t try this unless it’s Halloween because people freak out far too easy and won’t eat them.


Leave a comment