Archive | Candy RSS feed for this section

Christmas Cheer but first: Harried Merry Christmas

17 Dec

In the spirit of “gotta get stuff done,” the next few posts will occur over the next few days. That oughta be enough to get you through to the New Year and show you how to make those goodies everyone thinks you have oodles of time, talent, and resources to create. Your emergency plan: show everyone these posts, tell them it’s your blog, and explain how the dog/cat/kids/horrific dropping or freezer accident destroyed them all. I gotcher back on this one.

 Goody #1: Stained Glass Candy AKA Hard Candy.

Ingredients and Tools:

 Yes, that is a hammer.

Ready? Lettts go!

Begin with putting the candy thermometer in the pan. It should be near, but not touch, the bottom of the pan.  Yeah, I know, those clips are handy as all get out, ain’t they?

 Measure and pour the sugar, corn syrup, and water into the pan.


Give it a stir. Do NOT whack the thermometer. Turn the burner on medium and stir until the sugar dissolves. After that, don’t touch it. DO NOT TOUCH IT. Don’t do it. The instructions say so. Do too. Right here:

 https://www.lorannoils.com/p-8752-stove-top-hard-candy.aspx

While you’re waiting, begin the “clean as you go” method. We’ve got a lot to make today and we’ll be reusing our utensils because we don’t have a big commercial kitchen with unlimited utensils and such.

Other things to do while waiting and NOT TOUCHING IT:

Go through the stack of mail that’s been piling up for 2 weeks.

Wash the other stuff that’s been waiting during the contest-of-wills-to-see-who-will-clean-it-first. Sure, in effect, you lose the contest, but your candy will be all the better because you won’t be touching it.

Time to check on the creation without touching it.

Kinda yeller looking. I hope it’s not burning.

It reaches 200 fairly fast but then slows down like time on Christmas Eve when the kids are waiting for the morn. However, it does have a tendency to suddenly rise at the end.

If you are making 2 batches at the same time, start your second batch about 10 minutes after the first. At the end, you will not have enough hands or enough time to do what needs to be done right away. Plan on soaking the thermometer, pan, and spoon for a long time to dissolve the candy. In other words, don’t plan on mashed potatoes for dinner because your pan will not be ready in time.

It looks like we still have some time, so let’s get stuff ready for the next step. Take your hammer (yes, hammer; for Hammer Time, of course), put the top of it into the baggie, and wrap a rubber band around the baggie thusly:

Necessity is the mother of invention and all that.

Spray your cookie sheet with non-stick spray.

Aaannd that’s it. You’re ready. But the candy is not.

Lordy, that’s looking orange. Please don’t burn, please don’t burn, please don’t burn.

*Siiiggghh*  Back to whiling away the time while not touching it.

I guess we should keep cleaning. Shoot, the only thing left is the dreaded pearl dusting brush. I love the dust, hate the clean up.

Is it done yet?

Is it done yet?

Is it done yet?

Yes! It’s almost to 300 so take it off the burner and let it sit until it stops boiling. Do not stir it yet.

While that’s happening, take the caps off the flavoring and the coloring because you’re going to move quickly here. Also remember to put a hot pad under the cookie sheet before pouring this time, k? You’ve been lucky before, but don’t count on it this time.

Four hands is better than two in a moment, so either grow more hands or call someone in to help. It can be done with 2 hands, but it’s tricky.

We’re going to move faster than a naked toddler in the yard in front of the neighbors, so take a breath before we start. They won’t be time to breathe during.

Pour in the flavoring and coloring. It will spit, sizzle, and steam (wink, wink) so stand back as far as you can and plan on clean up time.

Stir it all together but don’t bump the thermometer. If your memory is better than mine, you will have removed it before this step. If not, just don’t bump it.

Since the heir to the throne eats most of the candy, it’s his choice of flavors. This year: coffee and strawberry. Yeah, I know. If offered whipped cream on top to make his cuppa complete, but he declined.

Once it’s combined, suit up your spare hands with mitts, and have s/he start pouring it onto the pan while you scrape the remainders.

That’s haute couture. Small town on Christmas break from college Haute Couture.

Tilt the pan as needed to spread it around a bit and then let it cool and harden. While you’re waiting for that, soak the first pan, spoon, and thermometer.

Second batch is ready, so repeat.

Looks much more appetizing, doesn’t it?

After half an hour, it should be ready to crack. Sift confectioner’s sugar over the top, and grab the hammer ‘cause it’s Hammer Time. Woo hoo!

Gently but firmly whack the bejeebers out of it until the pieces are the size you desire.

The pieces will be sharp, which is why I prefer the name Stained Glass Candy. Glass is right in there so you know it may be sharp.

Gently toss the pieces to coat them with the sugar.

Package as you like.

Yeeeaaaah, I’m not touching the coffee ones. Go ahead. You enjoy. I’ll stick with Strawberry.

Let’s clean up the mess and move on to the next project: Fudge!

‘Tis the season for ghosts and goblins!

26 Oct

It’s also the season for busy chicks with colds and assorted nastiness dwelling withing our sinuses!  Plus I seem to spend most of my ‘free’ time keeping my son, Crazy, away from all of the Halloween anamatronics we have out.  So forgive the usual tutorial, as I, the Frosting chick, have decided to share with you some cakes of the season that folks have shared with me.  A lot of these look like they were made by home bakers, so don’t expect clean lines and fancy piping, it’s Halloween for ghoulish sakes!  I’ve also thrown in one of my own, see if you can guess which one! And if you happen to know who made any of these scary creations, drop us a line so we can give them props!
First up, grab a plate and a spoon and dig in!

noname

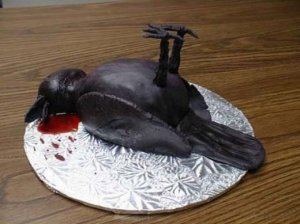
*channeling my best Eddie Murphy* “Dead bird, gonna put it on YOU!!!!!!”

crow

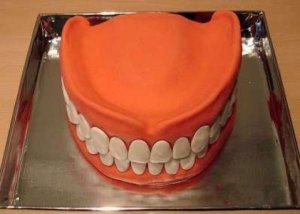
Did grandpa lose something?

choppers

Rocky Horror or just horror?

P1010932

I think I might have dated this guy in high school

igor

Jason seemed a lot scarier in the first flick…

jason

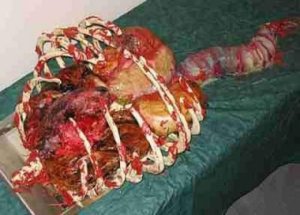
Innards anyone?  There’s plenty….

innards

realistic

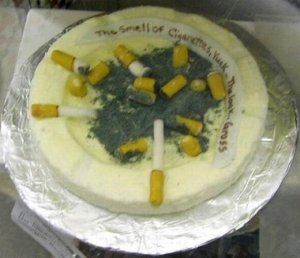
What’s up, smokers?

ash

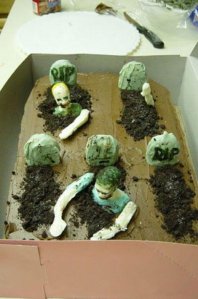
They only come out at night!  Now if they can just make it out of the box.


eh

Nothing wrong with a little holiday head

head

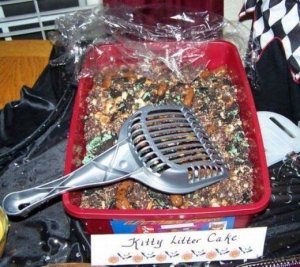
Honey, time to change the litter box

gross

I’m not sure what the hair is made of, but I AM sure I’d never, ever take a bite

really gross

Let’s give ’em all a hand, shall we?

hand

Chocolate Shells

10 Jun

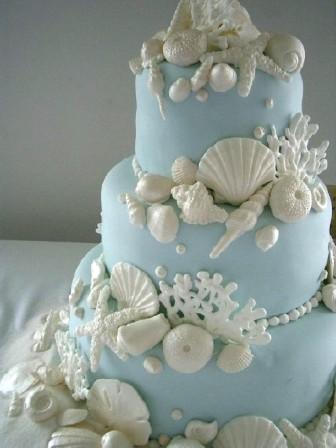
Isn’t this a lovely cake? I know how to cover cakes in fondant so all that’s left is to see if I can make shells like this. While these shells are fondant, I’m going to make mine from chocolate because I love chocolate and I always have a tough time getting fondant out of molds. I have a few leads on how to do that, but in the meantime: chocolate shells. 

Tools and Ingredients

Tools and Ingredients

The ingredients and tools are fairly simple for this project: a shell mold, some candy melts, and a way to melt the candy. I’m using an electric chocolate melting pot my daughter gave me because somehow she ended up with two. Yay for me! I love free stuff! LOL Not pictured just yet, but you will also need luster/pearl dust, a small bowl, and a food safe fluffy brush.

After gathering your ingredients, proceed with melting the chocolate. You can use a little melting pot, the microwave, or a double boiler. Remember to heat in small increments in the microwave, stir, and heat more until melted. If you leave it in too long, the chocolate will burn, and your house will stink for hours. The smell will be so bad it almost, just almost, turn me off chocolate for awhile. If you use a double boiler, remember to not put too much water in the second pan and keep the water at a low boil. Water and chocolate do not mix. Even droplets of steam in the chocolate will cause it to “seize” and it will become unusable. If this happens, you can try stirring in a little bit of vegetable oil to get it back to consistency. It doesn’t always work, but it’s worth a try before pitching it in the trash. So sad- chocolate in the trash. There outta be a law, I tell you. There outta be a law.

shells in molds compressed

Once your chocolate is melted, stir it so it’s smooth with no lumps at all. Then you simply pour the chocolate into the molds. After your molds are filled, lightly tap the molds on the counter top to release any bubbles. Bubbles are for champagne- not chocolate. I usually put my molds in the fridge at this point to make them harden faster and I personally think it helps the chocolate release from the mold.

unmold shells compressed

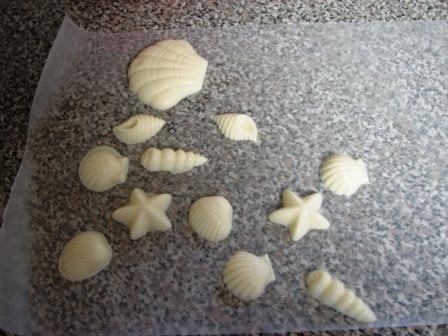
Once the chocolate is set (firm), turn the mold upside down and lightly tap the mold on the counter to release the chocolate from the mold. As you can see, a few of these need trimmed. Trimming needs to be done quickly yet gently. The longer you hold the chocolate in your hand, the softer it will get. Soft is bad. However, if they just need a tiny bit trimmed or smoothed, rubbing your hand along that area does a nice job without messing with a knife.

all shells unmolded compressed

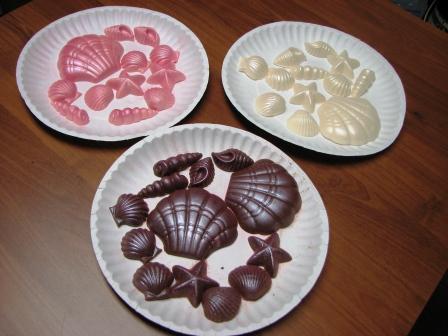
Ta-da! Brown, pink, and white chocolate shells. Pretty, huh? But not pretty enough just yet. Coming up: the final step that will make these babies good enough to put on any beach cake- even a wedding one!

This is the step we’ve all been missing. It’s like it’s some big secret or anything; but after today, even you, yes, you!, will be able to make stellar chocolate shells! Step right up to the check-out counter and purchase these: pearl or luster dust, and a food safe brush. If you wanna get real swank, get some Vodka at the liquor joint on the way home. Clear vanilla will also work, but Vodka is so much more fun! 😉 The color of dust you buy is personal preference, but most people stick with white or pearl dust. Today I used pink and white colors.

 When you get home, shoo the kids outside so they don’t see the vodka. After all, we don’t want the neighbors talking, do we? The last thing you want is your kids carrying wild tales to school about alcohol in your home. Ask me how I know this.

Okay, the kiddos are stashed somewhere now, so open up your purchases and grab a small bowl (custard cup size works well) while you’re throwing the packaging trash away. Pour a little bit of dust into bowl (and a lil vodka, if using. A lil vodka for you, a lil vodka for me. Oh, sorry. That’s a whole other story I may tell you some time. If you’re really nice.).

dusting shells compressed

Now, pick up the brush, dip in the dust, and go wild. Okay, not wild, because that would make a mess. Tap your brush against the side of the bowl to remove the excess. Using a little dust at a time, brush your chocolate until you’re satisfied with the colors. Don’t brush too hard or too fast or you’ll be picking dust boogers for a couple of days. Not pretty. Not PTA PC, either. They’ll never believe it was a kitchen accident. All sorts of weird theories/gossip will spread. For goodness sake, go easy on the stuff!

Finis!

Finis!

Voila! Shiiinnnyyyy. Preeetttyy. Must… touch… now. I used white on the white, pink on the pink, and pink on brown just for funsies. The brown turned purple. Betcha don’t find that in nature, huh? It’s all good, though. The cake I made to put them on had PMS or something that day so the now purple shells seems like the perfect match for that cake.

Lemon Cake, Lemon Filling, Lemon Icing. Lot o' Lemon!

Lemon Cake, Lemon Filling, Lemon Icing. Lot o' Lemon!

See? When good cake goes awry. My frosting wouldn’t smooth for nothin’ that day. Good thing this is a house cake (a house cake is any cake you don’t want people to look at and think, “She/He makes cakes?”). Since it wouldn’t smooth I tried going for the whole “cliff on a beach” look but that was not to be. The sand is crumbs from a cake that fell apart. I crumbled the failed cake into little pieces; let them dry for awhile, and the processed them in a food processor. The stuff at the top is supposed to be a grassy moss thing. The side décor is how ivy looks when your icing isn’t stiff enough. The cake was too far gone in the looks department by that time so I refused to stop and stiffen the icing. *Shrug* It’s house cake, anyway. The dudes here don’t care how it looks, they just want cake, cake, caaaaaakke.

So now you have pretty chocolate shells and you’re cleaning up the mess and stashing the vodka before the rugrats interrupt you. How on earth are you going to get the brush clean? Not with water. Step away from the sink. Walk towards the pantry. Find the cornstarch. Grab a couple of paper towels or paper plates or regular plates or something you can use to pour out some cornstarch and still have room to clean the brush. Wax paper would also work. Pour a small pile of cornstarch on one side of the plate (or whatever you’re using) and rub your brush around in the cornstarch. Don’t rub like you’re cleaning the mystery spots off the wallpaper, but rub hard enough to work the cornstarch into the bristles a bit. Now, move to the other side of the plate and pounce the brush to remove the cornstarch and pearl/luster dust. Pouncing is a motion kind of like jumping on a bed. Straight up, straight down, repeat. Again, not so hard you bend the bristles permanently but hard enough to remove the dust. You can even tap the brush on the plate. Repeat until all that comes out of the brush is cornstarch, then pounce a few more times to remove the remaining cornstarch. All clean! (I believe CakeCentral is where I found this little tip.)

Once they are completely dried, the shells can be stored at room temperature in a sealed container. Again, moisture is the enemy of chocolate so check on them occasionally to make sure they’re still in good shape. You can store them for as long as you would store the chocolate you used to make the shells with so check your container for an expiration date.

So, there you have it: how to make shiny chocolate shells. Not so hard, is it? Now, go forth and cake!