Archive | Desserts and Snacks RSS feed for this section

Hand Me Downs or I must have been Adopted or Banana Pudding

8 Sep

I used to think there was only one way to make banana pudding:

Line bowl with vanilla wafer cookies

Make instant vanilla pudding

Slice bananas

Layer pudding, bananas, and cookies in the bowl

Top with Cool Whip.

Shocking, isn’t it? It’s not that my mom can’t bake. She just doesn’t. At least, not without a box. In her defense, she did have 4 children. Who has the strength to do anything, much less bake from scratch, when you have 4 hellions underfoot? Therefore, my knowledge of banana pudding did not extend beyond boxes.  Not that there’s anything wrong with a box. I’ve been known to use them myself a time or two or three. Spend a buck on a box, stir in a couple of pantry staples, toss it into the oven, and call it dessert for tonight. When PMS cravings hit, there’s no time to waste so I fully give you permission to hit the box. My point is not that anyone should feel guilty about boxes. Sure, it would be nice if you recycle the box, but who am I to nag? This blog is (mostly) about food, so I’m happy to leave the save the earth stuff to someone else.

My point is that we should not forget there is another way. I’d say my great-grandmother never used a box, but I’d be lying like that ex-high school boyfriend of mine, yours, and everyone’s. A few years ago, my mother gingerly handed me a box containing my great-grandmother’s recipe book. With awe and appreciation, I opened the book, expecting to find a treasure trove of scratch recipes that could be handed down generation after generation. Instead, I burst forth with laughter when I saw this:

I guess my mother learned at the knee of her grandmother, after all.

My love of cooking and baking could not have possibly come from these people. Opening that book reminded me of the years I thought/hoped I was adopted. I had nothing in common with the people who called themselves my family. They’re mean, ugly, and stupid. Okay, I was like 13 when I thought that and I had the lack of a birth certificate to “prove” it. When I opened that book, it reminded me yet again how different I am from my family. A family reunion would not be complete with a bucket of the Colonel’s best and Waldorf salad. That’s the extent of their cooking. Mix and toss or drive through. To my great disappointment (at that time), my mother did eventually get a copy of my birth certificate, thus crushing my Lil Orphan Annie dreams forever. Therefore, I must conclude (after taking a good look at family pictures through the years) that my love of the kitchen arts must stem from the entire family’s love of eating. In particular, we’re rather fond of sugar. Thinking further, I started baking from scratch as a newlywed because I was bored. No license, no driver, no tv. Practically the only thing I had was a cookbook I stole from my mother.

So, I dabbled here, dabbled there, popped out a few kids, and kept on cookin’ every time I was bored. Which, again looking at pictures, was a lot. This boredom led to my discovery that not all banana pudding is from a box. I felt quite ashamed about it, actually. Did others know about this? Were they laughing behind my back? Was I only the one who made it with boxes? Oh, Alice Walker, you’ve got some things to account for! I cannot remember which book it’s in, but there’s a chapter where she wrote about her (now) ex-husband and something something something white people can’t make banana pudding something something something. Whaaattt? I’m white, I make banana pudding. Oh, Alice! How could you feel that way?

I read on and discovered that indeed, my “family recipe” for banana pudding is quite different. The chapter included her recipe so I decided to throw off my shame and learn to make it “the right way.” Or I decided to give it a shot to see if it could possibly be better than my recipe. Whichever. It was good. Pretty dang good. A bit soupy, but good. The soupy part could have been me, though. After all, I’m just hillbilly white chick with time on my hands.  🙂

In the years since that discovery, I have tried many banana pudding recipes and tweaked them until I came up with my own. At least, the latest version of my own. I’m always messing with recipes. I still occasionally make the ol’ family recipe, too. My kids like both versions, so I assume the sugar addiction continues for the next generation. Don’t blame me. It’s your great-great grandmother’s fault.

Scratch Banana Pudding Pie

Crust

½ c. coconut

½ c. flour

¼ c. butter, softened

¼ c. (scant) sugar

Mix with hands until crumbly and press into pie tin or 8 X 8 baking dish. Bake at 350 degrees until lightly browned, about 15-20 minutes. Cool. Do NOT turn off oven.


Pudding

4 bananas

1 c. sugar

¼ c. flour

2 c. milk

3 egg yolks (reserve whites)

2 t. butter

2 t. vanilla

While crust is baking, combine 1 c. sugar with flour in a medium saucepan. Mix well, and then stir in half the milk. Beat egg yolks and whisk into sugar mixture. Add remaining milk and butter.

Place mixture over medium low heat and cook until thickened, stirring frequently. Remove from heat and stir in vanilla extract.

While that’s cooking, slice the bananas and place a layer on the crust.

You want the pudding mixture to sheet off the back of the spoon when it’s cooked.

When it looks like that, it’s time to add the vanilla.

Stir that in and pour a layer of the pudding over the layer of bananas.

Add another layer of bananas and then another layer of pudding.

I know, it’s a lot of work so far. We’re nearing the end, I promise.

Meringue

3 egg whites (reserved from yolks)

¼ c. sugar

Chill mixing bowl and beater or whisk by placing in freezer. Glass or metal is preferred to prevent any grease residue from previous use preventing the egg whites from stiffening.

Using the chilled mixing bowl and beater or whisk, beat egg whites until foamy.

A bowl of ice water may be placed under the mixing bowl to speed whipping, if desired. Do not fill bowl too full with ice water or it will be difficult to beat the meringue.

Once the whites are foamy, gradually add ¼ c. sugar and continue to beat until stiff. Using the beater or a spoon, insert into meringue and lift straight up. If the meringue forms a peak and the tip of the peak does not bend/flop over, it’s at stiff peak.

Spread meringue over filling making sure meringue is all the way to the edges to prevent weeping.

Bake in 350 degree oven until meringue is lightly browned, approximately 15 minutes.

Clang the dinner bell, dessert is ready!

ETA: I’ve always had trouble with weeping and meringue. I made this again tonight but tried something a little different. Instead of mounding the meringue in the center and spreading it to the edges, try plopping meringue around the edges first and then fill in the center. Meringue is kinda tricky to smoosh around. As I’m moving it, I’m pulling on the pudding underneath and getting my spatula messy with the meringue/pudding combo. By covering the edges first, I don’t pick up the pudding and it’s easier to get that seal around the edge. Try it and let me know if it works for you, too. Mmm, Pie!

Need a Quickie?

18 Aug

Every once in awhile, life gets in the way. Oh heck, let’s just say it. Most of the time life gets in the way. We work cake in around car repairs, packing the kids off to various places, weather so hot you wilt before you get out of bed, and that elusive thing we now have to call a career instead of a job.  We’re shoving aside dinner dishes and bills trying to eke out a mere foot of space to get the crumb coat on the cake for tomorrow’s church supper. It doesn’t help that the materials and ingredients you gathered so carefully hide beneath rolling mats and cutters or you’re so addled you don’t remember you bought the perfect tool for the job months ago and end up hunting for something in the cabinets that will almost work for what you need.

 On the rare occasion that you had time to clean the kitchen that day, the last thing you want to do is mess it up again. The fam will take care of that for you, anyway. Enter “the event.” Bake sale, class snack, or office potluck is on the calendar, but who’s had time to look at that? This is when we all need a quickie. You need something decent, cheap, and quick. A small cake? Uh, no. One hour to bake, two hours to settle, hour upon hour to decorate- that’s more time than you’ll have in the next three months. Royal iced cookies? Even a simple design with two colors takes too long. Cake truffles? No room in the freezer and the chocolate magically disappeared during last week’s PMS/car broke down/kid is on your last nerve episode. Rice Krispie treats? Too simple? Eh, they can be. However, they require few ingredients, they are inexpensive to make, they cook up fast, and they require minimal counter space. It’s the simplicity that gets to you, isn’t it? Everyone loves to eat them, but no one is impressed that you made them. Anyone can turn on the stove, melt, stir, and press, right? What if we add a little something to the process? Give them a little wow factor, kick it up a notch, or whatever the latest cooking lingo is. Make the kid who forgot to tell you he needs a snack for 30 tomorrow dig out the cookie cutters and let’s get to work.

For those who have never made them… is there anyone who’s never made them? I think my kids made their first batch around 10 years old so I can’t imagine there’s a soul on this earth who hasn’t stuck a spoon in gloopy marshmallows just once. Anyway, just in case, here’s the recipe:

3 T. butter or margarine

10 oz. regular marshmallows or 4 c. mini marshmallows

6 c. Rice Krispies

That’s the official version from here: http://ricekrispies.com/recipes/the-original-treats.aspx#/recipes/the-original-treats


For this particular foray into the sweet world of no time, you will also need:

Cooking spray (not the olive oil stuff) or additional butter or margarine

Sprinkles- whatever you have on hand will do. If you have none on hand, don’t worry about it. Lord knows the last thing I want to make you do is make a trip to the store right now.

Get out a decent sized pot, a spoon (I prefer wood), cookie sheets, cookie cutters, waxed paper, and a plastic baggie.

A word about cutters: look at them before you start. Will you be able to see what the shape is easily? Are they tiny, fussy things? Are there parts that are too small making the treats fragile? If so, toss them back in the cabinet and choose different ones. This is supposed to easy and a little impressive. Don’t make it harder than it is. 🙂

Spray the cookie sheets with cooking spray. Put the butter in the pan, turn the burn on low, and start melting the butter. Add the marshmallows and stir until it’s all melted. Stir in the cereal and once that’s mixed decently, stir in the sprinkles.

Pour the mixture out onto the cookie sheets. Slip the baggie on your hand and press it out until it’s reasonably flat and even. Lightly spray the cookie cutters with the cooking spray and press them into the treats like you are cutting out cookies.

Once the treats are cut, remove the shapes from the pan and place them on the waxed paper to cool completely. Depending on the cutter, your time availability, your persnicketyness, etc… you may need to shape them a little or smooth them a bit more using your hands. You can reshape the leftovers and cut out more until the mixture is too hard to shape anymore. At that point, whatever happens to what’s left are wages for all you put up with in this life.

Stand back and admire your resourcefulness for a moment. Put away the guilt. No man is an island and no woman should make a Charm City equivalent creation when she has a task list that looks like your 5 year old’s Santa wish list. Trust me, it’s enough. I gave these to college students in my accounting class. The age range was barely shaving to gave up finding time to shave 10 years ago. They were impressed simply because they’re a different twist on the usual. Shoot, I’m not working right now and I only found time to write this because I can’t sleep. Therefore, if it sucks, blame typing at 3 a.m. and not the author, k?

Brown(ie) Nosing

16 May

Craving, craving, craving! For three weeks, I’ve been craving brownies. Still warm from the oven brownies. I’ve tried every substitute I could dig up from the kitchen. Thousands of calories later and I still want brownies. Please tell me why we do that? The thoughts are like this:
I want brownies

They’re bad for you

Warm from the oven

They have lots of calories

With nuts

You must learn self-control

I really love that low-fat brownie recipe

You’ll never lose weight eating this way

I know, I know

Try something else

Yeah, something healthier

That will get rid of the craving

Three weeks later, and you’ve eaten chocolate chips, cake, sugar-free chocolate, walnuts, icing, fondant, potato chips, peanut butter, celery and on and on and on.

How did that help? It didn’t. It hurt. That’s way more calories than one brownie would have been and you end up making and eating them anyway, so what’s the point?

I dunno. An exercise in self-control? Nope. I ate tons of stuff and still ate a brownie.

I say, go ahead and eat a brownie or two. Just make sure you can send the rest somewhere out of the house so you don’t eat all of them.

Low-Fat Brownies (from a cookbook that I can’t remember the name of):

(My notes are in parenthesis)

1 c. all purpose flour

1 c. powdered sugar

¼ c. + ½ T. unsweetened cocoa powder

¾ t. baking powder

1 ½ oz. semisweet chocolate, coarsely broken or chopped

3 T. tub margarine or butter

½ c. packed brown sugar

2 T. light corn syrup

1 T. water

2 t. vanilla

2 large egg whites

Preheat oven to 350 degrees. Line an 8”X8” baking pan with foil, making sure the foil overlaps the dish by about 1 ½” at two ends. Coat the foil with nonstick spray. Set aside.

Sift the flour, powdered sugar, cocoa, and baking powder onto a sheet of wax paper or into a bowl.

(I do this before the flour sifting stuff. Actually, I get this going and keep an eye on it while doing the flour sifting stuff. You will need the medium size pan even though it doesn’t look like it at first.) Place the chocolate and margarine in a heavy medium saucepan. Stir over the lowest heat until the chocolate is just melted and smooth. Be careful not to scorch the chocolate. Remove the pan from the heat and stir in the brown sugar, corn syrup, water, and vanilla until well blended. (This will take a few minutes to accomplish. Don’t get discouraged.)

Using a wooden spoon, beat the egg whites in to the chocolate mixture. (I temper the eggs first by adding a spoonful of the chocolate mixture to the eggs, stirring it, and then doing it again a few times. Cooked egg whites at this point will send you ‘round the bend so I strongly suggest tempering them before adding to the pot of chocolately goodness.) Gently stir in the flour mixture just until well blended and smooth. (Don’t overmix this at this point. Remember: it is when you add flour to baked goods that you must not mix too much or you may make the batter too tough and not get the result you want. After it’s mixed, I add about ½ c. chopped walnuts, but that’s not in the list of ingredients so carry on….) Transfer the batter to the prepared pan, spreading it evenly with a rubber spatula. (There doesn’t seem like there’s enough to spread, but keep spreading it.)

Bake on the middle oven rack for 24 to 28 minutes, or until the center of the top is almost firm when tapped. (Soft and a bit gooey is okay at this point. Right here is where too many of us go overboard and overbake and end up with cake-like/dense brownies instead of soft ones.) Transfer the pan to a wire rack and let stand for 15 minutes. Then, using the overhanging foil as handles, carefully lift the brownies from the pan and place the foil on a wire rack to cool.

Let stand until completely cooled. Peel off the foil. Cut, eat, (regret, feel guilty, do nothing about the guilt like go for a walk or not eat that evening snack, repeat, repeat, repeat.)

Yes, these are the only two pictures I have. I wanted brownies, a had not a thought about a blog post, gosh durn it!

At least I waited until the ice cream was gone. For a time, I wanted that brownie smothered in ice cream, fudge syrup, whipped cream, and topped with a few maraschino cherries. There’s some calorie savings there, anyway. Right? right? RIGHT?

Oh, Fudge!

20 Dec

The kitchen is clean so of course we must mess it up again right away. Why wait for the kids when you can do something yourself, right?

This recipe is from a book I stole from my mother when I left the nest. I could soft coat that, but it’s Christmas and Santa knows all anyway. It’s from an old HER Realty cookbook. It requires no candy thermometer, no marshmallow cream, and no fancy ingredients. It doesn’t even require a stove. This recipe was created using the new fangled machine of the time: the microwave. Man, I used to sit in front of ours convinced the radiation would kill me like Spock in that one movie. Ah, those were the days!

The ingredients are simple:

Peanut Butter Fudge

1 lb. Confectioner’s sugar (have extra on hand)

2/3 c. Chunky peanut butter

½ c. Unsalted butter or margarine

¼ c. Milk

 1 ½ t. Vanilla


Chocolate Fudge

1 lb. Confectioner’s sugar (have extra on hand)

½ c. Butter or margarine

1/2 c. Cocoa powder

¼ c. Milk

 1 t. Vanilla

¼ c. Nuts, broken (optional)

That’s it. For both fudges. Nothing fancy, nothing that takes hours, but something that will win over the boss and get your Christmas bonus after all. Hey, we can dream of more than just sugarplums, right?

First up: Peanut Butter Fudge

Soften a stick of butter and sift the confectioner’s sugar. Even if you think it doesn’t need it, sift it. You don’t want lumps or you’ll be in the kitchen all night and Santa won’t come ‘cause a creature is stirring. And stirring, and stirring.

Except for the vanilla, put all the ingredients in a microwave safe bowl. I use a casserole dish with its handy dandy lid for the task.


Nuke it for 2 minutes.

While it’s radiating itself, prepare your pan. Spray the pan or a piece of foil with nonstick spray. For the first time ever, I used wax paper. Don’t do that. It will be nearly impossible to get the fudge out of the pan. Always livin’ and learnin’ over here.

When the ding dongs it will look something like this:

Stir it for a bit so it looks something like this:

and then nuke for another 2 minutes. Stir again until it looks like this:

It will be hot, so don’t burn yourself like I usually do. Take it out and stir it until it’s smooth. Add the vanilla, and stir again.

It should look like this:

It will be thickish, but how do you know it’s thick enough? Experience. Don’t have any? I’ll lend you mine. Rarely is 1 lb. of confectioner’s sugar enough. Sure, you could give it a whirl. If it doesn’t set up, use it as a topping for ice cream or something.

If it’s not sheeting, it’s not thick enough. Add more sugar and stir it in. By not sheeting, I mean it shouldn’t run off the spoon:

Like a certain someone drooling over Clooney, huh?

If yours look like mine, add more sugar and stir it in.

Awesome one handed action shot, huh? I have the greasiest camera in town, hands down. One hand, anyway.

That’s better. It should cling to the spoon- kind of like stiff buttercream.


Plop the goop onto the foil.

(Pretend that’s foil. Sheer foil. My newest invention.  I’ll make scads of moolah, doncha think?)

Pick up all four corners and put the package in the dish.

Spread it around as needed.

Stick in the big cold box for at least 20 minutes. It’s done. You can freeze this, so feel free to make it at the beginning of December and pull it out Christmas Day. Because you have enough to do as the month flies by, that’s why. Do what you can, when you have time to do it.

Onto the fudge version. The process is a little different, so pay attention.

Put the butter into the microwave safe dish, and nuke it until it bubbles- about a minute or so.

Clean up tip: use the same lid you did for the peanut butter fudge. Odds are it’s still clean and it will be one less thing to wash if you use it again. Not stylish, but practical.

Working fast at this point (so the butter stays hot and it doesn’t get too stiff to work with), sift the cocoa powder and confectioner’s sugar into the bowl.

Add the milk.

Now add the vanilla.

Stir it until it’s smooth and perty.

Stir in the nuts, if using.

Add more confectioner’s sugar if it doesn’t look like this:

Like before, scrape it out of the bowl and onto the foil. Pick up the corners, and place the package in the dish.

Spread it around as needed, fridge that puppy until it’s firm. If you want something with more zing!, crush candy canes and press them into the top before it sets. You could also substitute chopped candy canes for the nuts or even sub mint flavoring for the vanilla. I’m more of a purist. I like chocolate and mint, but it’s hard to eat a whole pan of it. A couple of pieces, yes. A whole pan, no. What’s the point of cooking if you don’t want to shovel down the whole batch? That would be, I dunno, normal or something. *Shudder*

Done. One hour, two fudges. No fussing with equipment. Simple. Yummy. Freezable. Why not? Santa eats it whether it takes 2 hours or 2 minutes. It’s sugar. Eat it.

Chocolate Shells

10 Jun

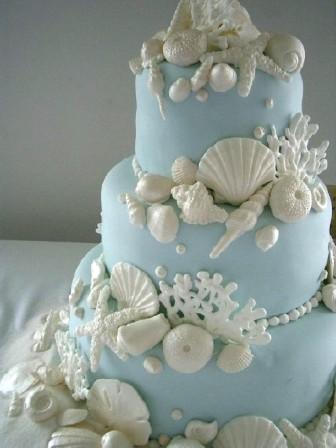
Isn’t this a lovely cake? I know how to cover cakes in fondant so all that’s left is to see if I can make shells like this. While these shells are fondant, I’m going to make mine from chocolate because I love chocolate and I always have a tough time getting fondant out of molds. I have a few leads on how to do that, but in the meantime: chocolate shells. 

Tools and Ingredients

Tools and Ingredients

The ingredients and tools are fairly simple for this project: a shell mold, some candy melts, and a way to melt the candy. I’m using an electric chocolate melting pot my daughter gave me because somehow she ended up with two. Yay for me! I love free stuff! LOL Not pictured just yet, but you will also need luster/pearl dust, a small bowl, and a food safe fluffy brush.

After gathering your ingredients, proceed with melting the chocolate. You can use a little melting pot, the microwave, or a double boiler. Remember to heat in small increments in the microwave, stir, and heat more until melted. If you leave it in too long, the chocolate will burn, and your house will stink for hours. The smell will be so bad it almost, just almost, turn me off chocolate for awhile. If you use a double boiler, remember to not put too much water in the second pan and keep the water at a low boil. Water and chocolate do not mix. Even droplets of steam in the chocolate will cause it to “seize” and it will become unusable. If this happens, you can try stirring in a little bit of vegetable oil to get it back to consistency. It doesn’t always work, but it’s worth a try before pitching it in the trash. So sad- chocolate in the trash. There outta be a law, I tell you. There outta be a law.

shells in molds compressed

Once your chocolate is melted, stir it so it’s smooth with no lumps at all. Then you simply pour the chocolate into the molds. After your molds are filled, lightly tap the molds on the counter top to release any bubbles. Bubbles are for champagne- not chocolate. I usually put my molds in the fridge at this point to make them harden faster and I personally think it helps the chocolate release from the mold.

unmold shells compressed

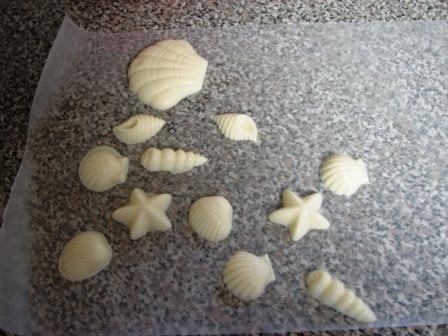
Once the chocolate is set (firm), turn the mold upside down and lightly tap the mold on the counter to release the chocolate from the mold. As you can see, a few of these need trimmed. Trimming needs to be done quickly yet gently. The longer you hold the chocolate in your hand, the softer it will get. Soft is bad. However, if they just need a tiny bit trimmed or smoothed, rubbing your hand along that area does a nice job without messing with a knife.

all shells unmolded compressed

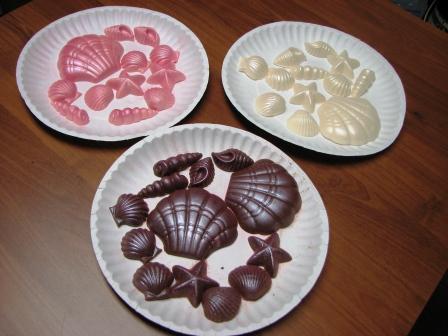
Ta-da! Brown, pink, and white chocolate shells. Pretty, huh? But not pretty enough just yet. Coming up: the final step that will make these babies good enough to put on any beach cake- even a wedding one!

This is the step we’ve all been missing. It’s like it’s some big secret or anything; but after today, even you, yes, you!, will be able to make stellar chocolate shells! Step right up to the check-out counter and purchase these: pearl or luster dust, and a food safe brush. If you wanna get real swank, get some Vodka at the liquor joint on the way home. Clear vanilla will also work, but Vodka is so much more fun! 😉 The color of dust you buy is personal preference, but most people stick with white or pearl dust. Today I used pink and white colors.

 When you get home, shoo the kids outside so they don’t see the vodka. After all, we don’t want the neighbors talking, do we? The last thing you want is your kids carrying wild tales to school about alcohol in your home. Ask me how I know this.

Okay, the kiddos are stashed somewhere now, so open up your purchases and grab a small bowl (custard cup size works well) while you’re throwing the packaging trash away. Pour a little bit of dust into bowl (and a lil vodka, if using. A lil vodka for you, a lil vodka for me. Oh, sorry. That’s a whole other story I may tell you some time. If you’re really nice.).

dusting shells compressed

Now, pick up the brush, dip in the dust, and go wild. Okay, not wild, because that would make a mess. Tap your brush against the side of the bowl to remove the excess. Using a little dust at a time, brush your chocolate until you’re satisfied with the colors. Don’t brush too hard or too fast or you’ll be picking dust boogers for a couple of days. Not pretty. Not PTA PC, either. They’ll never believe it was a kitchen accident. All sorts of weird theories/gossip will spread. For goodness sake, go easy on the stuff!

Finis!

Finis!

Voila! Shiiinnnyyyy. Preeetttyy. Must… touch… now. I used white on the white, pink on the pink, and pink on brown just for funsies. The brown turned purple. Betcha don’t find that in nature, huh? It’s all good, though. The cake I made to put them on had PMS or something that day so the now purple shells seems like the perfect match for that cake.

Lemon Cake, Lemon Filling, Lemon Icing. Lot o' Lemon!

Lemon Cake, Lemon Filling, Lemon Icing. Lot o' Lemon!

See? When good cake goes awry. My frosting wouldn’t smooth for nothin’ that day. Good thing this is a house cake (a house cake is any cake you don’t want people to look at and think, “She/He makes cakes?”). Since it wouldn’t smooth I tried going for the whole “cliff on a beach” look but that was not to be. The sand is crumbs from a cake that fell apart. I crumbled the failed cake into little pieces; let them dry for awhile, and the processed them in a food processor. The stuff at the top is supposed to be a grassy moss thing. The side décor is how ivy looks when your icing isn’t stiff enough. The cake was too far gone in the looks department by that time so I refused to stop and stiffen the icing. *Shrug* It’s house cake, anyway. The dudes here don’t care how it looks, they just want cake, cake, caaaaaakke.

So now you have pretty chocolate shells and you’re cleaning up the mess and stashing the vodka before the rugrats interrupt you. How on earth are you going to get the brush clean? Not with water. Step away from the sink. Walk towards the pantry. Find the cornstarch. Grab a couple of paper towels or paper plates or regular plates or something you can use to pour out some cornstarch and still have room to clean the brush. Wax paper would also work. Pour a small pile of cornstarch on one side of the plate (or whatever you’re using) and rub your brush around in the cornstarch. Don’t rub like you’re cleaning the mystery spots off the wallpaper, but rub hard enough to work the cornstarch into the bristles a bit. Now, move to the other side of the plate and pounce the brush to remove the cornstarch and pearl/luster dust. Pouncing is a motion kind of like jumping on a bed. Straight up, straight down, repeat. Again, not so hard you bend the bristles permanently but hard enough to remove the dust. You can even tap the brush on the plate. Repeat until all that comes out of the brush is cornstarch, then pounce a few more times to remove the remaining cornstarch. All clean! (I believe CakeCentral is where I found this little tip.)

Once they are completely dried, the shells can be stored at room temperature in a sealed container. Again, moisture is the enemy of chocolate so check on them occasionally to make sure they’re still in good shape. You can store them for as long as you would store the chocolate you used to make the shells with so check your container for an expiration date.

So, there you have it: how to make shiny chocolate shells. Not so hard, is it? Now, go forth and cake!